Why Use Canvas Commons?
Canvas Commons is a repository where you can find, import, and share instructional resources. Commons allows you to:
- Save Time: Instantly import entire courses, modules, quizzes, or assignment templates created by peers, either within USD or from the global Canvas community.
- Collaborate: Share your resources with your department or the entire college with just a few clicks.
- Standardize Quality: Access templates that ensure your course remains accessible and easy for students to navigate.
Ready to explore? Click the Commons icon in your global Canvas navigation bar to get started. View below for guides on using Commons.
1. Finding Templates
- On the Commons home page, you will see some USD-specific featured templates.
- If those templates don't meet your needs, use the search bar (1) at the top to look for specific keywords such as "Course Template," "Module Template," or a specific type of assignment.
- You can sort resources by Most Relevant, Updated, Favorites, Downloads, or Title (2).
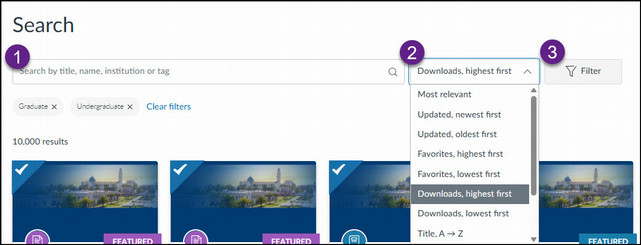
- Click the Filter button (3) to narrow results by:
- Type, such as Courses, Modules, and Assignments
- Grade Level: Filter by Undergraduate or Graduate.
- Shared With: You can choose to view resources from all institutions or only those shared with USD.
2. Previewing Templates
Before committing to an import, you can view the content:
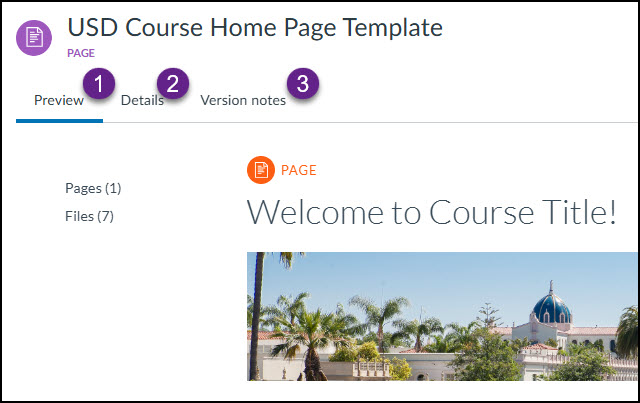
- Click on the title of any resource in the search results.
- By default, you will land on the Preview tab (1). Here, you can click through the sidebar (Modules, Pages, Assignments) to see the actual layout and placeholder text.
- Click the Details tab (2) to see the version history, file size, and any specific instructions provided by the creator.
- The Version notes tab (3) will show any version specific notes.
3. Importing into Your Course
Once you’ve found a template you like, follow these steps to bring it into your course shell:
- On the right side of the template page, click the blue Import/Download button.
- A list of your current courses will appear. Check the box next to the course(s) where you want the template to go.
- Click the Import into Course button at the bottom of the list.
- A green banner will appear indicating the import has started. Depending on the size of the template, it may take 2–5 minutes to appear in your course.
Best Practice: It is highly recommended to import a course template into an empty course shell or a Sandbox first. Importing a course template into a course that already has content can lead to clutter or overwrite existing settings.
If you would like to share an entire Canvas course to Commons, view the following step-by-step guide:
- Navigate to the Canvas course you wish to share.
- In the Canvas Course Navigation menu (the inner sidebar), click Settings at the bottom.
- On the right-hand sidebar (or bottom if on a small screen), click the Share to Commons button.
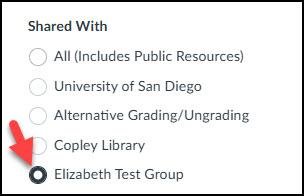
- Select your audience for who can see the resource: Only Me, All of University of San Diego, specific Groups (if part of a Canvas Commons Group), or the Public (any Canvas Commons user).
- Optional: you can select Content Type (Template or uses an Open Textbook).
- Choose License (Copyrighted, Public Domain, or Creative Commons)
- Enter Metadata: Add a Title and Description. We also recommend adding at least one tag, which can help other faculty find your course. You can upload a Thumbnail Image if desired.
- Select Grade Level: Use the slider to mark the appropriate academic level (e.g., Graduate, Undergraduate).
- Click the Share button: Your course will begin processing. It usually takes 10–30 minutes to appear in search results.
If you would like to share specific resources like Modules, Assignments, Quizzes, Pages, or Files, instead of an entire course, follow these step-by-step instructions:
- Navigate to the area in the Canvas course where the resource lives (e.g., the Modules page or the Assignments list).
- Click the three vertical dots (⋮) icon to the right of the specific item name and select Share to Commons from the menu.
- Select your audience for who can see the resource: Only Me, All of University of San Diego, specific Groups (if part of a Canvas Commons Group), or the Public (any Canvas Commons user).
- Optional: you can select Content Type (Template or uses an Open Textbook).
- Choose License (Copyrighted, Public Domain, or Creative Commons)
- Enter Metadata: Add a Title and Description. We also recommend adding at least one tag, which can help other faculty find your course. You can upload a Thumbnail Image if desired.
- Select Grade Level: Use the slider to mark the appropriate academic level (e.g., Graduate, Undergraduate).
- Click the Share button: The resource will begin processing and will be available once finished.
Why Use Canvas Commons Groups?
Groups act as private folders within the Commons. If you are part of a "Biology Department" group, you can share resources that only your fellow biology faculty can see and import. Instead of requesting that faculty be added to your courses to share content, which could compromise the integrity of your course, you can share your content through Commons.
A. How to Create and Join a Group
- Creating a Group: Canvas Commons Group creation is restricted to Canvas Administrators. Faculty should contact LDCsupport@sandiego.edu to request a Canvas Commons group for their department or project team.
- Joining a Group: Once a group exists, an Admin or Group Manager must add you.
- Note: You must have clicked the Commons icon in Canvas at least once before to "activate" your Commons account before an admin can find you to add you to a group.
B. Sharing Resources to a Commons Group
Once you are a member of a Commons group, you can share your content directly with the group:
- Follow the standard Share to Commons steps (view guides on this page).
- Under the "Who can use this resource?" section, select Groups and choose the group you want to share the resource with.
C. Finding Commons Group Resources
To find what your colleagues have shared with your group:
- Enter Commons from the Global Navigation.
- Click the Filter button.

- In the filter results, scroll down to the Shared With section and select the group you would like to view.
Now, your search results will only show items shared specifically with that group and you can choose which content you would like to import.
If you are designated as a Group Manager for a Commons group, you are able to do the following:
- Add/Remove Members: You can manage who has access to the group.
- Designate Group Managers: You can designate other members to be group managers (you can have multiple managers in a group).
- Curate Content: Managers can edit resource details (e.g. sharing permissions, license, metadata - cannot edit the source itself) or remove any resource shared to the group, even if they weren't the original uploader.
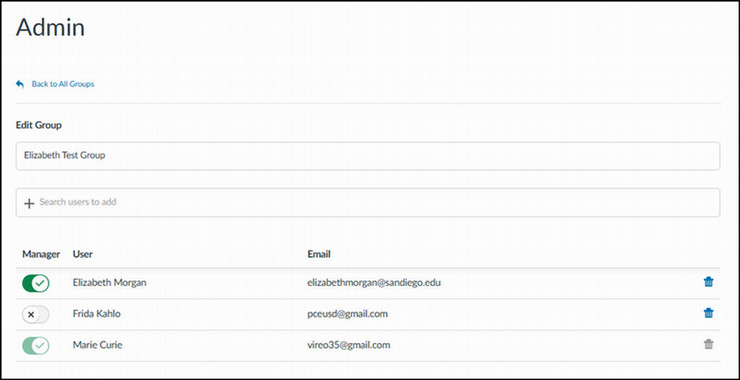
How to Manage Group Members?
- To manage members in a Commons group, click on the Admin tab at the top of Commons and select Groups:

- Click on the group that you want to manage. You can choose to add or delete users or designate another group member as a manager.